page list

Showing posts with label recipe. Show all posts

Monday, September 10, 2012

Easy Baked Apple Recipes

With Fall fast approaching, baked apple and pumpkin dishes are sounding so good to me right now! I decided to focus on apples first and have come up with a couple of delicious, easy and satisfying recipes for anyone doing a Whole30, eliminating sugar from their diet or just simply loves the comforting goodness, warm baked apples have to offer.

You don't need me to remind you all of the nutritional benefits of eating a whole food like apples right? I mean, you probably already know all about the terrific soluble fiber, vitamin A, iron and calcium that is present in baked apples...of course you do...whew, glad I don't have to explain :)


Baked Spice Apples with Coconut Cream

Serves 1

2 small baking apples (I used Granny Smith) sliced into 8 wedges each, preferably peeled (I did not peel mine, too lazy)
1 Tbsp of melted Ghee or butter (I used ghee)
1/2 tsp of Pumpkin Pie spice or Apple Pie spice (I used pumpkin pie spice)
pinch of sea salt
1 Tbsp of Coconut Cream* (or as much as you want)
Optional: chopped nuts

1. Preheat oven to 400 degrees.

2. Add your apple wedges to a 8x8 baking dish.

3. Drizzle melted ghee or butter over the apples.

4. Add Pumpkin Pie spice or Apple Pie spice and sea salt to the apples.

5. Stir apples together with the spices and ghee to coat.

6. Bake uncovered for 30 minutes or until for tender or as soft as you like.

7. Add baked apples to serving bowl, top with coconut cream and nuts if you are using.

8. Enjoy!

*To get coconut cream, put a can of full fat coconut milk in the fridge for 24 hours (sometimes overnight is not long enough to harden the cream). Open can and scoop out with a spoon the white coconut cream that has solidified in the can. Whisk cream in a bowl till nice and creamy and smooth.

If you are not on a sugar detox of some sort and feel the apples themselves are not sweet enough for you, add a little maple syrup or raw honey before topping with the coconut cream.


Baked Cinnamon Apples and Wild Blueberries

Serves 1


2 small baking apples (I used Granny Smith) sliced into 8 wedges each, preferably peeled (I did not peel mine, too lazy)
1 Tbsp of melted Ghee or butter (I used ghee)
1/4 tsp (rounded) of Cinnamon
About 4 swipes on a rasp of whole nutmeg or a good pinch of powdered nutmeg.
1/4 Cup of frozen, wild blueberries (Trader Joe's has some), I'm sure regular blueberries will work just fine
pinch of salt
Optional: Coconut cream, nuts

1. Preheat oven to 400 degrees.


2. Add your apple wedges and blueberries to a 8x8 baking dish.

3. Drizzle melted ghee or butter over the apples.

4. Add spices and salt to the apples and blueberries.

5. Stir with a spoon to coat fruit with spices and ghee.

6. Bake uncovered for 30 minutes or until for tender or as soft as you like.

7. Add baked fruit to a serving bowl and top with nuts or coconut cream or both.

8. Enjoy!

If you are not on a sugar detox of some sort and feel the apples themselves are not sweet enough for you, add a little maple syrup or raw honey before adding your toppings.

Other topping ideas are:

shredded coconut
yogurt
dried cherries
dried cranberries
raw honey
maple syrup
Caramel Sauce-homemade and without High Fructose Corn Syrup
Coconut Nectar
Brown Rice Syrup

Or you can make the Baked Apples a topping for:

Vanilla Ice Cream
Yogurt
Oatmeal
Porridge
Pork or other meat
Baked sweet potatoes

However you decide to eat these baked apples, I hope you find it yummy!

Steph

Monday, August 13, 2012

Prosciutto Wrapped Dates

Since no sugar is allowed on the 21 Day Sugar Detox or the Whole30, I have been searching for sugar free bacon locally with out any luck at all. Online, you can purchase some from U.S. Wellness Meats, but we cannot afford that right now unfortunately.

While reading posts in the Whole30 Forum, someone mentioned they used prosciutto in place of bacon and that the ingredients were only pork and salt...perfect! The person mentioned that he purchased his from Trader Joe's, so the next time I was down there (I love Trader Joe's) I looked for it. They had a few different kinds of prosciutto, only one did not contain sugar, so please always read the ingredients, never assume. I ended up buying two packages, each pack contained 4oz and cost $5.90...yikes I know, but I was desperate lol. I later found the same brand of prosciutto (still be sure to check ingredients) at Costco, you get 12oz for $12.00, so you basically get 4oz free over there, a much better deal!

Anyhoo, the reason I was hoping to find some sugar free bacon or an acceptable substitute was to make these gorgeous, tasty beauties!


Prosciutto Wrapped Dates


Prosciutto Wrapped Dates


Package of Prosciutto
Dates- I prefer the caramel like flavor of deglet, but medjool will work great too.


If you were to use a whole 4oz package of prosciutto, you will need 14 dates. Each slice of prosciutto makes two wrapped dates.

Preheat oven to 400 degrees.

With a knife (regular of paring), gently press into the flesh of the dates. Then with your thumbs, pry the flesh open as gently as you can and remove the pit.

When all dates have been pitted, carefully remove a slice of prosciutto and gently tear in half with your hands. Then take one half and fold lengthwise. then wrap around the date. Don't worry about the prosciutto tearing while you are removing it, it happens all the time, you can still salvage it easily, just fold as best you can and wrap.

Lay on parchment covered baking sheet seem side down.

Bake in oven for 12 minutes. Let cool, then enjoy!


*If you are able to have dairy, stuff dates with feta cheese before wrapping.

**If you are able to have nuts, stuff dates with almonds, walnuts, or pecans before wrapping.

Here are some photos of me putting them together...


Here is a picture of the brand of prosciutto I used.

I got this package from Trader Joe's. The one from Costco is a two pack and looks a little different.


Some of you might be wondering why I am eating dates when I am trying to avoid sugar. Simple, dates are a whole, unprocessed food, perfectly fine to include in your Whole30 as long as you don't over do it. (Plus they are full of fiber, B vitamins, potassium, etc...)

These dates are perfect for taking on a hike or bike ride, they are little energy bundles! I hope you will give them a try, they are quite delicious!

Steph

Wednesday, August 8, 2012

Sauteed Cinnamon Peaches with Coconut Cream

As I mentioned in a previous post, I am doing the 21 Day Sugar Detox and the Whole30 simultaneously. They are not the same thing, the Whole30 is much stricter and it's purpose is much more encompassing. I am following the Autoimmune Protocol as outlined in Dallas and Melissa Hartwig's book "It Starts with Food", they are the creators of the Whole30. My list of food that I can eat has been narrowed down by the Autoimmune Protocol, so I need to learn how to prepare tasty dishes with the foods I can eat, luckily, there is still quite a bit to choose from.

I created this dish to add a little flair to my meal yesterday, and found it to be very good, so good I wanted to share it with you all.


Sauteed Cinnamon Peaches with Coconut Cream

Serves 1

1 Tbsp Coconut Oil ( I prefer the cold pressed, flavorless kind)
1 Cup Sliced, Ripe Peaches (fresh is best, but frozen is great too)
1/4 tsp Cinnamon
Pinch of Salt
Coconut Cream
Unrefined sugar, honey or stevia (optional)

Put can of full fat coconut milk in fridge so that the cream will harden and rise to top. Best to leave in fridge overnight, but at least 3 hours will work.

Spoon out hardened, white coconut cream from can into a small bowl, save rest of coconut milk for a smoothie. Whisk coconut cream until creamy and looks like whipped cream without the stiff or soft peaks. Put back in fridge and keep cold.

Heat a small skillet on medium high heat. Add the coconut oil to skillet and let get hot. Carefully add the sliced peaches to the hot skillet and let sit for a few minutes before stirring. Add cinnamon and stir every so often, but let the peaches sit for a few minutes in between. When peaches are lightly caramelized, turn off heat and put in a serving bowl. If you need to add some extra sweetness, now is the time to add it (I did not use any in mine and found it perfect for me). Put a dollop of coconut cream on top, then sprinkle on a small amount of cinnamon.

This recipe is quite versatile, you could use nutmeg is place of cinnamon if you like. Also in place of the coconut cream, you could use fresh raw cream or regular whipped cream.

I hope you give it a try and let me know if you liked it.

Steph

Monday, July 30, 2012

Crispy Baked Drumsticks


The

It's now a week into my second 21 Day Sugar Detox and I am doing great, no more cravings at all now. The first week is always a bit tough, since there is usually withdrawal symptoms and of course the psychological part that needs to be overcome...replacing the bad habit or craving with something good (in my case herbal tea) or eliminating it all together.

I have decided to join a group of people doing a Whole30 starting Aug.1st. You can read about the program here, the information is free. However, they have a book out called It Starts With Food (I highly recommend you get it!!) that explains in detail the science behind the Whole30 and much more. I am convinced doing the Whole30 will increase my health and healing tremendously. I will be following the Autoimmune Disease recommendations to avoid eggs, nightshades, dairy, nuts, seeds, and NSAIDs.


I will not be weighing myself during the Whole30, but I will when I am done and I will take a picture of how I look after as well. I am going to use these pictures as my before pictures, since I pretty much look the same and weigh the same.


So, please wish me luck! I'll still be doing the 21 Day Sugar Detox, just morphing it into the Whole30 lol.

Now on to a delicious recipe!

Crispy Baked Drumsticks

24 drumsticks
1/3 C. Coconut oil* or butter melted and mixed with EVOO
sea salt
onion powder
rosemary
pepper

Preheat oven to 375.

Line a baking sheet with parchment.

Put drumsticks in a colander and rinse well and drain.

Lay drumsticks down on the parchment with the skin facing up.

Pour oil into a small bowl and using a pastry brush, liberally brush the oil onto the drumsticks (if you are using coconut oil and your chicken are fresh out of the fridge, the coconut oil will harden and create a shell on your chicken, don't worry it's perfectly fine)

Coat the drumsticks liberally with sea salt and onion powder. Then sprinkle on the rosemary and pepper.

Bake in preheated oven for 60 min. The skin will be browned, crispy and yummy...enjoy!

*I use cold pressed, flavorless coconut oil, I am not a fan of the strong coconut flavor in Extra Virgin on my foods.


Monday I will be doing a review of a book that I was privileged to receive an advanced copy of. I am so excited to share it with you all, I have been having a blast making recipes from this book and I have learned so much from it as well! Now stay tuned because I am going to be having a giveaway, some lucky winner will be mailed a free Practical Paleo book!


This book will be released Aug. 7th, 2012 and can be pre-ordered.

Have a wonderful week,

Steph

Sunday, July 1, 2012

Coconut Caramel Rice Pudding Recipe

Sometimes I just get a craving for some rice pudding. I love the flavor, the texture, the creaminess of it all, it is comfort food for me. Maybe it reminds me of my Grandma Estes, she made the best food from scratch period.

This recipe is a healthier version of rice pudding but still creamy and delicious. You get healthier fats from the coconut milk and it won't spike your blood sugar like regular sugar does.

Surprisingly you cannot taste the flavor of coconut if you follow my recipe as is, however if you use less sugar or a different sugar, you may taste it.


Coconut Caramel Rice Pudding

3 Cups (packed) of cooked rice ( I used white basmati rice)
2  14 oz (or close) cans of full fat coconut milk
2/3 Cup of Coconut/Palm sugar*
pinch of salt or to taste
1 tsp of vanilla

In a medium size saucepan, add coconut milk, rice, sugar and salt. Cook on medium heat until rice pudding is almost as thick as you would like, take off the heat and let cool for 5 min. then add vanilla and mix well. Continue to let the pudding cool, it will thicken more as it cools.

When cool enough to eat, serve as is or with a dollop of whipped cream on top. Other topping ideas are...

Cherry sauce
Sauteed apples
walnuts
almonds
raisins

* You could use regular brown sugar in place of the coconut sugar, I would only use 1/2 Cup since coconut sugar is not as sweet as regular. For just Coconut Milk Rice Pudding, sub 1/2 Cup of regular white sugar in place of the coconut sugar.

Enjoy!


My next post will be about our adventures at the Sequoia National Park. Gorgeous Country!!

Steph

Monday, June 18, 2012

Baking Bacon

In case you were wondering why I have not posted about my progress on my second 21 Day Sugar Detox, well that is because I have postponed it till August. We have too much going on right now, we are preparing for our camping trips taking place this summer. I am trying new recipes, and figuring out what to bring for meals and snacks. So far I have some ideas...

1. Hobo meals
2. Omelet in a bag
3. Pancake mix, flours premixed in a bag with instructions on outside of bag
4. Oatmeal (gf oats of course) mixed with either some dry, organic milk or some protein powder (will have to test this out, I have some Sun Warrior Brown Rice Protein powder that I want to try), dried fruit and nuts, premixed in a bag with instructions also written on bag.

Quick, easy and cheap (but high quality) is the name of the game for me, if you have any other great ideas on what I can bring, please share!

Now on to Baking bacon!


If you are a regular reader of my blog, you probably know by now I like to make easy but nutritious meals. I'm not a fan of washing a lot of dishes either, so I try to find ways to minimize the use of dishes, utensils and bake wear that I use.

We love bacon, but after making it on the stove for years and hating all the splattery mess that goes with it, not to mention the stuck on bacon bits at the bottom of my cast iron skillet that I like to not have to soak and scrub if possible to maintain my nice seasoning on it. I decided there must be an easier way, so I researched online to see if anyone was baking bacon in the oven, and sure enough there were many blog posts on the subject. After reading several recipes, I got the gist of it and tried my hand at it and now I love it and will not make bacon any other way....well ok except when we are camping, I will use my skillet :)

I like Trader Joe's Apple Smoked, thick cut, nitrate free bacon and that is what I used, be aware that if you use a thinner bacon the time will be shorter so keep an eye on it while it's on the oven!

Baked Bacon

Preheat oven to 400 degrees.

Line a cookie sheet with parchment, it is actually better to have your parchment be larger than the cookie sheet as it will make keeping your cookie sheet clean much easier.

Lay out your bacon side by side each other till you have filled the pan.


The package of Trader Joe's bacon is a rather small pack so I am able to bake it all at one time.

When oven is preheated, put your pan in and bake for 20-25 min. That is it...so easy and much less messy!

If you are using regular sliced bacon, I would bake for about 10 min. or so.

Wait till bacon fat is cool and solidified if you can, before gathering up the parchment corners and dumping in trash.

If you have more bacon than what can fit on one cookie sheet and you want to bake it all in one batch instead of waiting for the first to finish, line another cookie sheet with parchment like the first and lay the rest of your bacon down on it. Put both sheets on the oven, but half way through baking I would take the bottom sheet and switch it with the top one, to ensure more even cooking.

This method is what I have found to work for me, I hope it helps you in your future bacon endeavors!

Steph

Monday, June 4, 2012

Counting my blessings!

There is a song we sing in church called, "Count Your Blessings" that I love, I find myself singing it at home quite frequently as of late. Sometimes I forget how blessed I really am and get caught up in feeling sorry for myself when life doesn't go my way. Here is the last verse of the song "So amid the conflict, whether great or small, do not be discouraged, God is over all; Count your many blessings, angels will attend, help and comfort give you to your journey's end"

I am going to be over here in my little part of the world counting my many blessings, naming them one by one, feel free to join in with your beautiful voice too!

Much has happened this past week, we've started grilling on our grill to avoid heating up the house. It's been very hot during the day, but wonderfully cool at night. I plan on enjoying to the fullest, these cool evenings while it lasts!

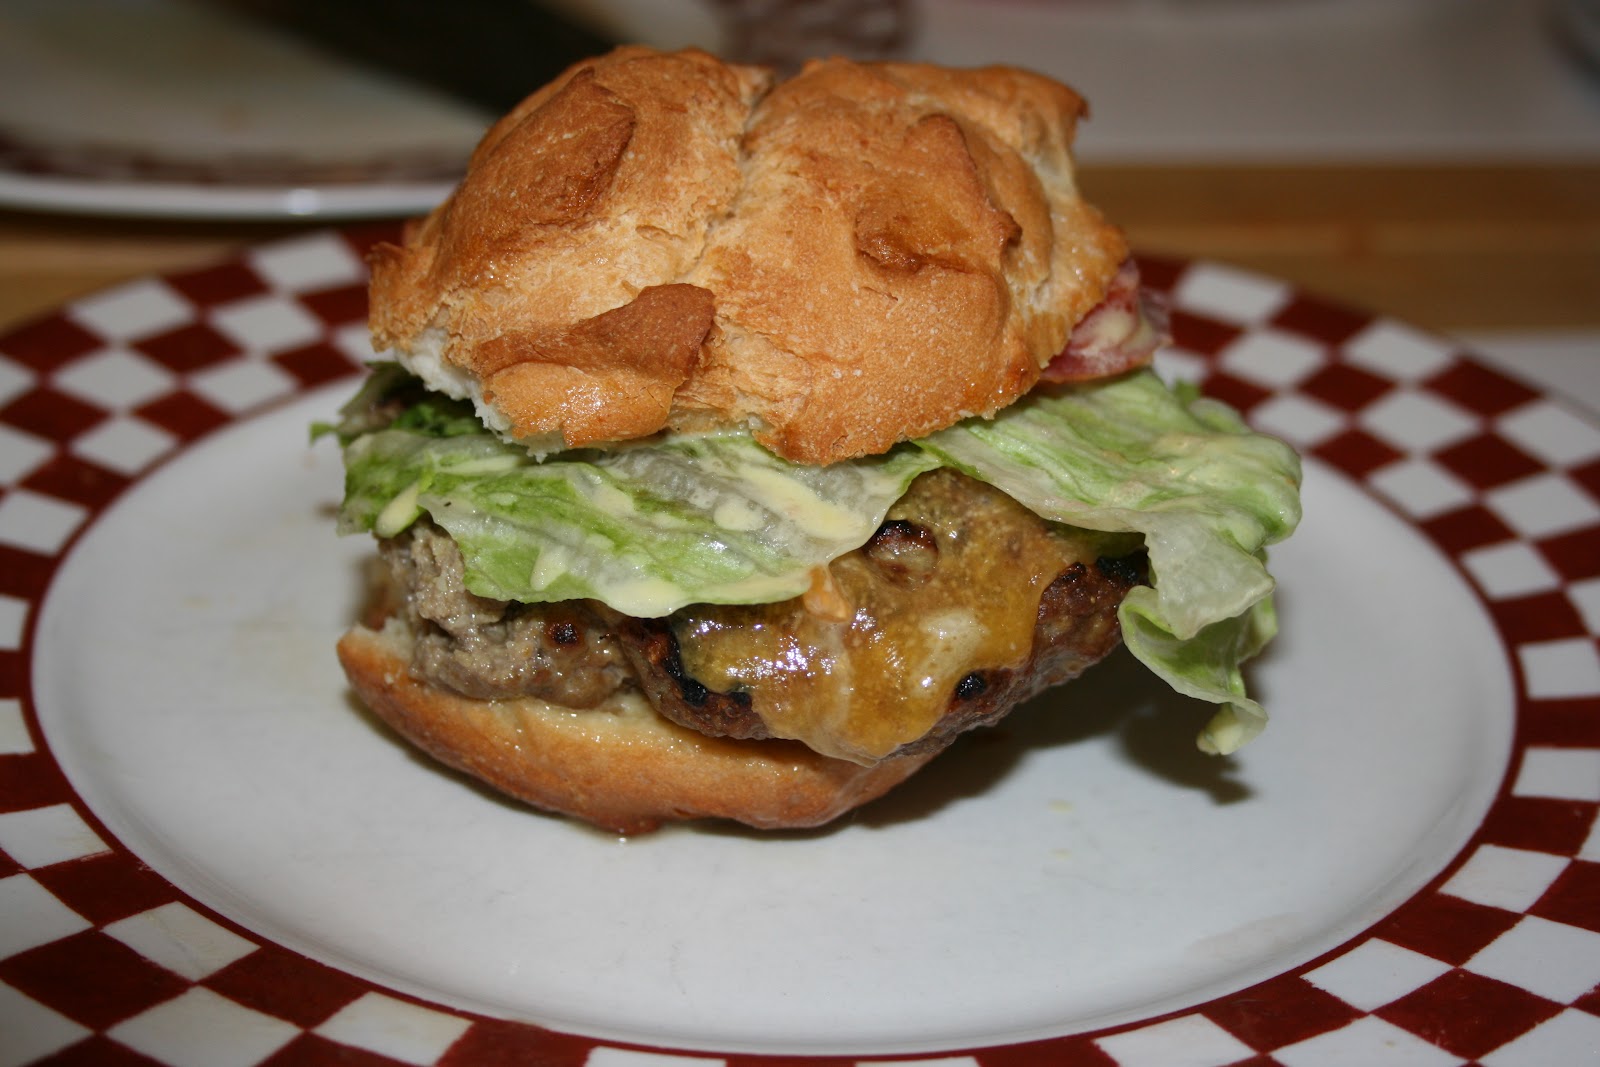
We decided the first thing we were going to grill would be hamburgers, thanks to Kade our oldest son. He was craving a big juicy cheeseburger since we don't eat out anymore. Now that we have a gluten free household, that meant we needed some gluten free hamburger buns and I'll tell ya, store bought gf hamburger buns are not very palatable! I used the Udi's Copycat Bread recipe by Extraordinary Life in my previous post and made the 2 loaf recipe. I divided up the dough into 12 equal amounts on my greased Crown Muffin pans and put them into the oven to rise for 30 min. according to the recipe instructions. I however only baked them for 30 min. instead of 70 min. You do not need Crown Muffin pans to make hamburger buns, just use parchment and two cookie sheets, divide the dough into 6 piles on each sheet, then flatten and round each pile as best you can. Put into oven and let rise for 30 min. and bake for 30 min. You do need to let them cool or they will go flat and the texture of the bread will be different. However if you decided to use them as rolls, you could definitely eat them while hot.

Gorgeous!

Perfect!

My bun + My Hubby's 1/2 lb. juicy burger = Drool worthy deliciousness!


Look at the great deal I found at iherb...

Excuse the messy room and focus on the 10# Now brand Mega Pack Tapioca  Flour bag (and two of my cuties).

I use Tapioca starch flour in the Udi's Copycate Bread recipe as well as many other gluten free baking recipes, so it was a wonderful find when I saw this 10# bag on iherb for less than $20.00! I have an iherb code that will get you $5.00 off your first order, just enter FAT433 at checkout. If you are already an iherb customer...what are you waiting for, go order some!

We have a couple of camping trips planned this summer, so I've pulled out some of my camping books I have collected over the years.


This is not even all of them...yes, I am a cookbook addict...or should I say book addict :) I have a few coming from the Library to check out as well. I am looking for easy recipes for our trip. Not just easy, but healthy too.

Anybody got a recipe they would like to share?

Any tips on gluten free camping would be wonderful and welcome!

Steph

Monday, May 21, 2012

Best gluten free bread recipe and another 21 Day Sugar Detox!


I want to share with you all the recipe for the best gluten free bread we have had, and I have bought and made many loaves...trust me! But first here is some history on how I came to find this treasure of a recipe. About a year and half ago, I asked my husband if we could have a gluten free household to avoid cross contamination and to help me stay gluten free. Luckily he agreed, because that is the sweet, hunky kinda guy he is and he wanted me to succeed in my attempt to get healthy. Well, in our family, we like sandwiches, they are easy to make and fairly inexpensive...that is if you don't eat gluten free. I found some gluten free sandwich bread cookbooks and made some of the recipes, the results were pretty good, not wonderful though. We also purchased some store bought breads and found we liked Udi's and Rudi's the best, but sometimes both would end up being dry, not to mention expensive. I decided to Google "Udi's bread recipe" and came across this blog, Extraordinary Life: On the road to joyful cooking, she had a recipe called Udi's white bread copycat recipe. I loved how her recipe was so detailed, and the instructions easy to understand. The comments on this recipe was also full of great tips (I urge you to read them if you plan to make this bread). The first time I made this bread, we were in love, sandwiches were tasty and enjoyable again...and guess what, it tasted waaaay better than Udi's (sorry Udi's) not to mention soft and not dry (of course it's not as soft as Webers bread, that stuff is more air than anything anyway).

Fast forward a year or so and I have made quite possibly a hundred loaves of this bread, and have not had any flops! I have also started using a scale to weigh my flours. I have found two benefits to this (that I can think of, could be more) one, it gives consistent bread results, two, it saves you money from using more flour than you need. Don't worry if you don't have a scale, the original recipe contains the measurements in cups.

I have reproduced this recipe on my blog with permission from Lisa @ Extraordinry Life. I have experimented with and created the gram conversions for those that weigh their ingredients like I do, here's the converstion for you.

1 Loaf

120 g Tapioca flour
119 g  Brown Rice flour
48 g Potato Starch (not Potato flour)
2 Tbsp oil
2 Tbsp sugar
3 egg whites
1 pkg or 2 1/2 tsp of dry active yeast (she says rapid rise yeast, but I have always used dry active with no problems)
2 tsp xanthan gum
1 tsp salt
1 tsp baking powder
1/2 tsp vinegar
3/4 cup warm water

Preheat oven to 170 degrees. Once preheated, turn oven off.
Lightly grease on 8 x 4 bread pan. (Albertson's sells Good Cook non stick 8 x 4 pans, I have two of them)

*Grease pan with butter or vegetable shortening.
*In a medium sized bowl, weigh out your flours.
*Add into flours, xanthan gum, salt, baking powder, stir carefully with a whisk or spoon to combine.
*Add water, oil, sugar, yeast into a small bowl or measuring cup and mix until combined.
*Allow water to sit while yeast starts to get foamy.
*Meanwhile, in a kitchenaid type mixer with whip cream attachment, whip egg whites for approx. 1 minute or until it develops soft peak.
*Add vinegar to egg whites and whip for a few seconds.
*Add yeast mixture to the egg whites in the mixer.
*Turn mixer on lowest setting and spoon flour into the egg whites, then turn mixer on to a medium setting and whip the batter for 3 minutes.
*With a spatula, spoon dough into pan and flatten as best you can with back of spatula.
*Put pan in oven and leave to rise for 30 min.
*When 30 min. is up, turn oven on to 350 (keep pan inside) and bake for 70-72 min.
*Take out of oven and turn out of pan, let cool completely before slicing or bread will fall flat and have a different texture. Letting cool completely is key...hard I know, but be patient :)
*Slice with serrated knife and enjoy!


2 Loaf Recipe:


240 g Tapioca flour
237 g  Brown Rice flour
96 g Potato Starch (not Potato flour)
4 Tbsp oil
4 Tbsp sugar
6 egg whites
2 pkg or 5 tsps of dry active yeast (she says rapid rise yeast, but I have always used dry active with no problems)
4 tsp xanthan gum
2 tsp salt
2 tsp baking powder
1 tsp vinegar
1 1/2 cups warm water

Same instructions as above!


Fresh out of the oven!

Beautiful loaves. 

Great texture, not to mention yummy!
Update: Here is the bread recipe made as hamburger buns! I used my Crown Muffin pans, but you really do not need to use them. You can spoon the dough into 6 equal piles on a parchment covered cookie sheet, then flatten and round each pile as best you can, then put in oven to rise for 30 min. according to recipe instructions. Bake only for 30 min. instead of 70! Let them cool, before using or the same thing will happen, they will deflate. You will have to plan ahead, perhaps make them earlier in the day if you will be having hamburgers for dinner. They make excellent rolls too! If you want to use them as rolls, you could definitely eat them not long after they are out of the oven, just break apart with your hands and smear with some butter...

The one loaf recipe will make 6 hamburger buns.

I have two boys (ok three if you count my Hubby) so I used the two loaf recipe to get  12 buns.

My Hubby made 1/2 lb. burgers lol, but boy were they good!


Costco has at this time a great deal on dry active yeast, it looks like a large block of yeast that you will have to chisel pieces off (had an argument with hunny as I did not want to have to break off chunks of yeast lol, but he won out because it is so much cheaper than at the regular store), but when you open it, the yeast is completely granulated and ready to use...so glad I gave in to my hunny!

Now on to the next bit of news...

I am going to do another 21 Day Sugar Detox on Monday, May 28th - June 18th.

After successfully completing the last one, I can feel myself falling back into my old habits, cravings are coming back and the control I thought I had is slipping away. I've made some huge improvements in my health, my thyroid medication has been lowered significantly and I don't want to go back, I need to move forward...so BRING IT ON! I can do this again, you betcha!

Anyone want to join me? You've got a week to gear up emotionally and physically...you can do it!!

You can choose:
1. Just get the sugar out in all it's forms, click here for a list of 50 different names for sugar. Read labels carefully, you'll be surprised, it's in many things!
2. Get all forms of sugar out and not eat anything sweet, including fruit and stevia, splenda or other non-caloric sweeteners. Studies show that for certain people, just eating something that tastes sweet even though there is no sugar, their bodies will release insulin causing fat storage.
3. You can follow the 21 Day Sugar Detox program by Balanced Bites. This program costs $21 is full of information and recipes, check it out.

So who is with me? We can encourage and support each other!

Steph


Monday, April 23, 2012

Last Day of Sugar Detox and a Recipe for Meaty Spaghetti Sauce.

Today is the last day of the 21 Day Sugar Detox that I've been on. I've faithfully avoided sugar except for Easter day and I must admit, sometimes it was pretty tough, especially in the beginning, but now at the end, cravings are pretty non existent. So now what? Well, I plan to only have sweets on our Friday family nights and on special occasions, I also plan to continue eating the way I have been, paying close attention to ingredients in food that I eat, making sure it does not have any sugar or sweet ingredients, you see the 21 Day Sugar Detox not only cuts out sugar, it cuts out anything sweet! For good reason though, studies are coming out that show some people who eat sweets even if it is sweetened with a non caloric sweetener like stevia or Splenda even (yuk) will release insulin anyway, causing our body to store the food as fat. I really believe I was/am one of those people. There have been times when I felt like I gained weight just looking at a delicious chocolate cake :)

I am excited to say that I have dropped 3 lbs. and now fit it in a size smaller jeans! I am now at a weight that I have not been at for almost six years! As I said earlier, my cravings are pretty much gone and that was the real purpose of the Sugar Detox for me anyway, so the weight loss is a nice bonus...a very nice bonus. I am hoping that my hormones may be closer to normal and so I will attempt to get off the Proactiv skin care that I have had to use to keep my skin clear, wish me luck! I will continue to do several of these 21 Day Sugar Detoxes this year and perhaps forever, it will help me keep my sugar craving from getting out of hand again.

Now on to a couple of recipes.

This delicious spaghetti sauce is very easy to make and will feed a family of 5 for 3 meals, so it's inexpensive too!

Meaty Spaghetti Sauce

1Tbsp of olive oil or butter
1 red onion-diced
2 lbs ground beef or turkey or a combo (you actually could use less if you wanted, this amount makes a nice hearty sauce)
2  14.5 oz cans of organic tomato sauce
2  14.5 oz cans of organic diced tomatoes
1 Tbsp of dried parsley or fresh if you like
1 Tbsp or to taste of garlic salt
1 tsp dried basil
1/2 tsp dried oregano

Heat on medium high a large 6qt pot. Add oil and wait till hot, then add your diced red onions, cook for a couple of minutes then add the ground meat and cook till browned. When meat is browned add the rest of the ingredients and bring to a boil. When it starts to boil, turn the heat down to low and let it simmer till you have finished making your pasta and serve.

Please add spices to your taste, this recipe is easy to play with and customize to your family's liking.
Enjoy!

Meaty Spaghetti Sauce on sauteed yellow squash ribbons with a sprinkling of parmigiana cheese, brown rice pasta is great too!

I made this quinoa pizza many times the past three weeks, it is delicious, easy and does not contain yeast (not that I have a problem with yeasted foods). I imagine you could use buckwheat groats (is not like wheat, and is gluten free despite the wheat in it's name) in place of the quinoa. While I wish I could take credit, the recipe is not mine and can be found on Charity Dasenbrock's For Life Blog, the picture however is mine, I hope it makes you drool :)

Quinoa crust pizza with pepperoni, black olives and cheese. I have made it vegetarian as well and it was equally delicious! 

Tomorrow I will have new pictures of how I look now, I'm not sure there will be much difference, but that's alright, what is important is getting healthier one day at a time!

Would any of you be interested in joining me on another 21 Day Sugar Detox in the future?

Steph